Webmail Basics
You can change the webmail settings (which uses the popular Squirrel Mail interface) for a variety of preferences. The information below covers some of the most common requests we've received from users.
Click on any of the thumbnail images to view a full size version.
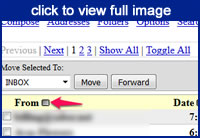
Sorting Email List
Your email can be sorted by any of the main column headings. Just click on the box next to the heading you wish to sort by. It will then become a triangle pointing up or down to indicate sort order is ascending or descending. Click on the triangle to reverse the order. Most people sort by the Date / Received column so if it is not appearing that way and you want it to, just click the box next to that column heading. Also, a conventient way to delete emails that are taking up a lot of space on the server is to sort by Size and remove the emails with M next to the number in the size column, which indicates megabytes. For example, 12M would be an email that is 12 megabytes in size (due to a large attachment typically).
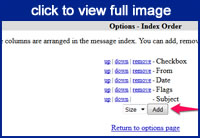
If you don't see the Size column heading (it's typically the last one on the right), you can add it by clicking Options at the top area of webmail, then Index Order and choose Add next to Size as shown in the second image below.
 |
 |
General Display Options
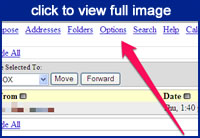
You can change the fonts, colors, number of messages shown per page, and other settings under the Display Preferences link. This can be found by first clicking on the Options link at the top of the page once you have logged into your webmail (see image example below).
 |
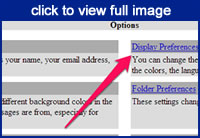
Once you are in the Options section, you will have several menu choices. Click on Display Preferences.
 |
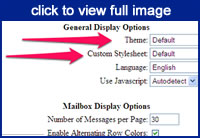
Once you are in the Display Preferences section, the top area (General Display Options) is where you can change the fonts and color schemes. You can experiment to get things the way you want as there are quite a few choices under the Theme and Custom Stylesheet selections. Each time you make a change be sure to click on the Submit button at the bottom right of the page. Once that is done you will likely need to reload/refresh your browser for the new settings to appear.
Below are images showing where to make changes and an example of how things will look after making some.
 |
 |
 |
Change Number of Messages shown per page
This is especially helpful when you want to delete emails in bulk. While in Display Preferences, simply change the option labeled Number of Messages per Page to a higher number, such as 300. It is not advisable to go higher than 500 as it may slow down loading of messages significantly. Again, after making any change, you will need to click on the Submit button at the bottom right of the page.
Deleting Emails in Bulk
If you are near or over the allowed quota for mail being left on the server, you can easily remove multiple messages in Webmail. First, be sure you have changed the Number of Messages per Page as shown in section above.Then go to your inbox and click the page that has the emails you want to delete. Next click Toggle All (#1 in sample image below), which will check all the emails shown. NOTE: Some browsers may show this as Select All. Then click Delete (#2 in sample image). This will delete all the checked emails. However, they won't be removed completely from the mail server until you click on Purge next to the Deleted Items folder (#3 in sample image). Purge will not appear immediately. It will show when page updates (about every 5 minutes) or next time you log in.
 |
Message Display & Composition
If you want to view messages in something other than plain text, that's a selection under the Message Display & Composition section (again, this is found by clicking Options and then Display Preferences). You'll need to check the choice for Show HTML Version by Default. Likewise, if you want to change the size of the composition window when typing a new email, that can be done in this section. The sample image below will show you where.
 |
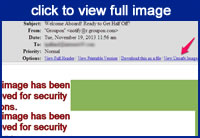
Unsafe Image Rules
You may be getting a message indicating images have been removed for security. This is the default setting with Squirrel Mail in an effort to help prevent installation of malware and viruses. But if you know the source and trust it, you can make the images appear like normal.
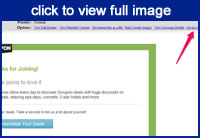
First, you can simply click on View Unsafe Images (in the area just below the Priority line in the header info) while reading a message. Images should appear and now you will have a new link option of Always trust images from this source. If you do indeed know this is a trustworthy source, click on that link.
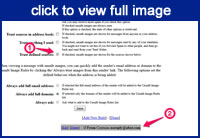
That will add the sender's email to your safe sources list. However, there's still another step to avoid having to manually click the View Unsafe Images when receiving emails from this sender. While it's been added to your 'safe' list, you will need to click on the Unsafe Image Rules link found on the Options page, then make sure you check the box for Trust defined sources. Click Save after checking the box and future emails from the same sender should have images appear automatically.
Click on the thumbnail images below for examples of the process.
 |
 |
 |